Rust-Oleum Projects
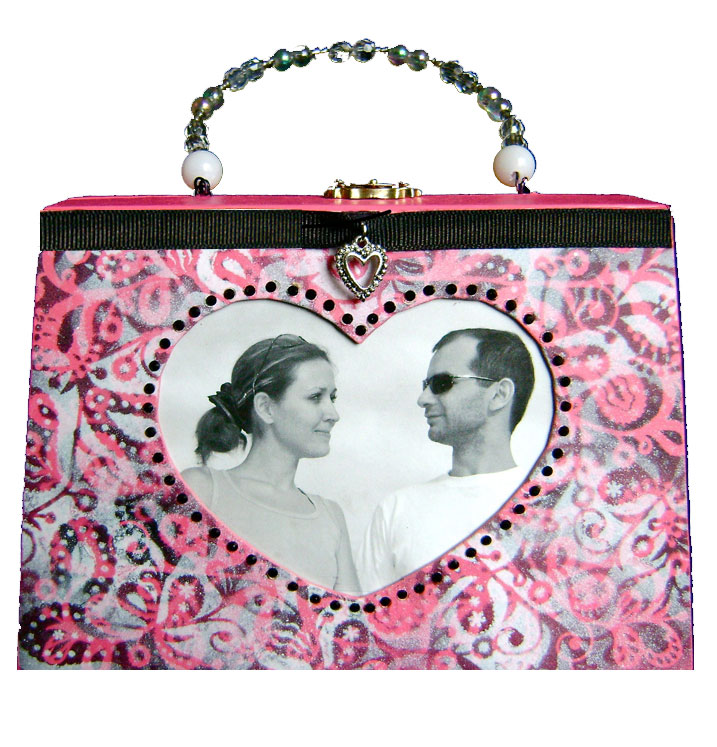
Valentine Wooden Purse
Browse Projects
-
Tools & Supplies:
-
3-in-1 Craft Glue
-
Black Gross Grain Ribbon Quarter Inch Wide
-
Black Rhinestones 3mm
-
Card Stock
-
Painter's tape
-
Paisley Stencil
-
Personal Photo Image
-
Phillps Head Screwdriver
-
Rhinestones
-
Silver Heart Charm
-
Wooden Purse
INSTRUCTIONS:
- With a Phillips head screwdriver, remove the screws and the gold latch hardware.
- Mask any handle with something that will absorb paint like paper towels or fabric.
- Remove the clear plastic insert from the heart by pushing it up from the center of the heart. The plastic will slide out from the opening in the top edge of the purse front.
- Trace the plastic outline onto cardstock, cut it out and slide it back into the purse front. Do not mask off this area when painting the purse front.
- Mask off other areas to prevent buildup on surfaces you aren’t immediately working on. This will make it easier to create an evenly painted surface on the inside and outside of the purse.
- Paint the purse inside and out with pink paint working in sections. You do not need to paint the middle area of the inner back wall as it will be covered with the Love Message Page.
- Once the purse is painted pink inside and out, and the paint is dry, spray stencil adhesive onto the paisley stencil. Cover one side of the purse with the stencil. Press firmly to secure the stencil parts to the purse surface. The stencil is not large enough to cover the entire purse front, so you will paint one side first, followed by the other. Do not spray paint close to the outside edges of the stencil or you will end up with hard lines of paint. Paint only about an inch away from the stencil edge.
- Paint the opposite side of the purse front with black in the same way. When you finish you can reposition the stencil over the any areas you missed, and paint a small patch to eliminate bare spots.
- Reposition the stencil at an angle on the first side you painted black. Spray white on small portions of the stencil, not the entire surface. Freely move the stencil around the purse front, applying more white paint sparingly. With each move, press the stencil to be sure it is adhering to the purse.
- Using a brush, touch up any areas you might have missed with pink paint.
- When all the painting is done, remove the masking from the beaded handle and replace the gold hardware.
OUTER PURSE FINISHING DETAILS
- Print out your personal photo. You can change any photo from color to black and white by altering the saturation in a program like Photoshop or Photoshop Elements or simply by choosing to print it from your computer in black and white.
- Remove the cardstock from the heart and cut out the heart shape created by the paint overspray.
- Place the heart shape over your photo to include as much of the image as you like, and cut the photo to the size of the cardstock outline.
- Together, place the photo with the clear plastic over it, back into the slot in the purse front.
- Slide a heart charm onto the black ribbon. Apply 3-in-1 craft glue to the backside of the ribbon. Position it on the purse with the charm centered then cut off the excess ribbon. Coat the ends of the ribbon with glue to prevent it from fraying.
- Apply rhinestones to the heart shape. Begin with one stone in the very center top and another at the center bottom.
- Work around the heart shape adding stones about 1/16” apart. A hot fix rhinestone applicator makes this an easy job and holds the stones securely in place.
INNER PURSE FINISHING DETAILS
Print out the Love Message Page found here
Trace the outside of the purse back onto paper. Remove 1/8” from each side. Put the page into the purse to check the fit. Adjust if necessary. Use the perfectly sized paper to cut the Love Message Page to the correct size. The type should bleed off the sides of the page. Apply glue to the pack edges of the Love Message Page and press into the inner back wall of the purse.
"Designed and created for Testors by Domestic Diva Online


